| Related Pages: |
 |
| Venting for Furnace
...At the time when you are doing the Rough-in, you should insert pieces of the PVC pipes in holes of the bond. Moreover, if there are no marks on the bond, find out, where it goes and what the diameter of pipes is necessary to use...
|
| Venting
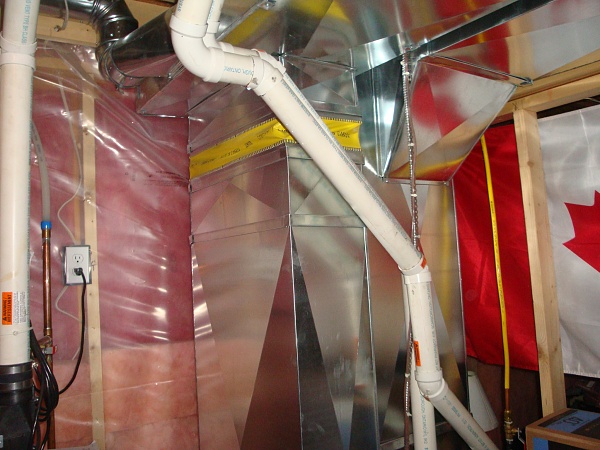
For the 90 % + furnaces, venting should be done with use of the PVC pipes. For the 80,000 BTU furnaces usually they use 2”PVC pipes, and for the 100,000 and higher BTU furnaces - 3” PVC pipes. However, if venting for the 80,000 BTU furnaces should be very long, or it is necessary to use too many elbows then you should also use 3”PVC pipes. In order to find out what kind of pipes you need to use, you should look at the installation manual chart that is supplied with every furnace.
|
|
Installation of Combust. Air Intake
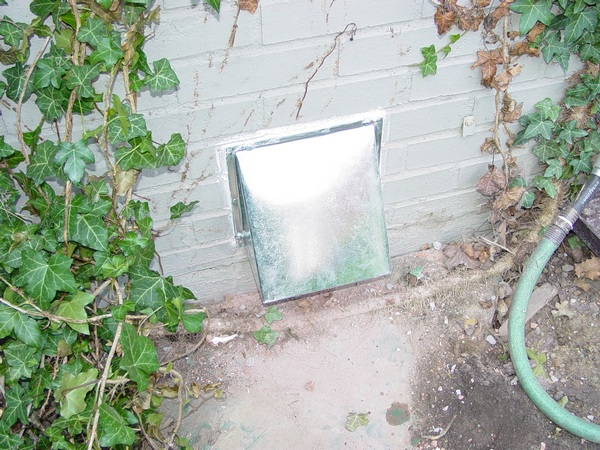
This chapter from the Energy Saving Edition book gives a detailed description of the Combustion Air Intake installation, which according to code must be an important element of your HVAC... |
|
Combustion Air Intake in Pictures
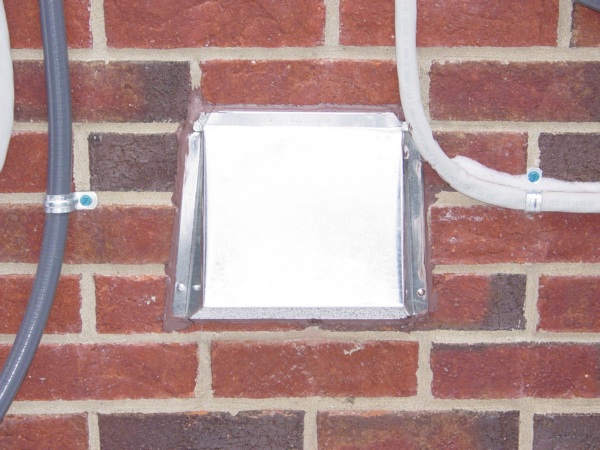
For years, I was preaching about high necessity of the combustion air intake, but did not have one installed in my own house. I have both - high efficiency furnace and a water heater and a water heater...
|
|
|
Practical Ideas
Usually, when I'm not answering questions or making new pages for this website I'm checking out numerous Forum websites. Some of the questions and solutions on these websites seem useful to me and I use them all over my website. However recently I came up with a decision to make a page where my visitors can share their ideas with me and I will publish them on this page.
So, if you got your question answered and thinking that it would be useful to anyone else please let me know on this page. The best way of doing that would be providing me with a link to your thread or submitting your question and the best answer to it. If I'll find out that your thread is worth publishing I will pay you $3.00 by Pay Pal! For the second and every next one I will pay $5.00!
|
|
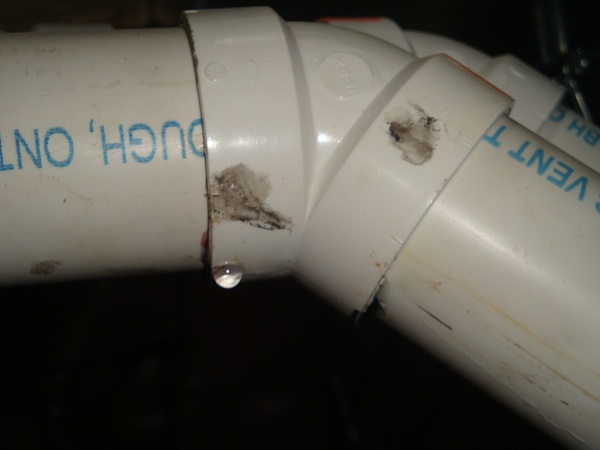
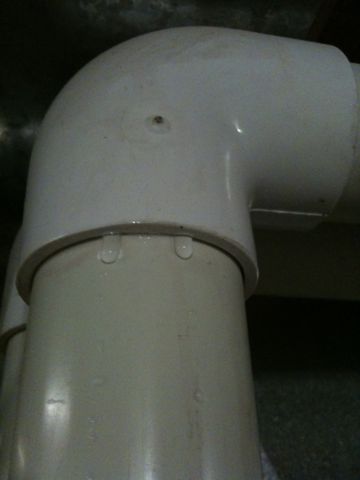
Water Leak on Gas Furnace Exhaust PVC Pipe
Question
I have an Amana 92% high efficiency gas furnace.
The 2-inch exhaust pipe is leaking water at a couple of the joints around four feet from the furnace. I know that gas has a lot of condensation in the exhaust. However is it just a matter of re-sealing the joints or is there a bigger problem.
The house and furnace are 4 years old
I hope the two pictures help:
Answers
Looks like somebody didn't use primer on the joints before the glue. Cut out the bad parts and replace that section or replace all the pipe. I would replace all the exhaust since two joints failed already, PVC is cheap.
Picture shows what I consider bad practice. Always glue the male pipe. Easy to miss and many times a job will be closed up and some joints missed completely. If you glue the pipe, it will ooze out at the fitting
I would rip all that venting out and do it properly; nowhere near enough glue or primer was used (I can see a tiny bit of purple in the second picture). IPEX's instruction state that primer isn't needed if installed above 0 degrees C (or around 0, I forget the exact temperature), but BC and Alberta require its use at all times, and I imagine other provinces do also. The proper way to make the joints is to prime the pipe and fitting, immediately apply a liberal amount of glue to the pipe, then the excess to the fitting and insert hold and spin until set. You should also ensure that there is at least ¼" per foot of slope on the exhaust pipe, and that all venting clearance requirements have been met. Not trying to scare the OP, but if the installer can't even cement pipe together they may have made other mistakes.
I think that the above answers are good, but I wouldn't replace all PVC pipes! In four years it's leaking in two places only, so a homeowner could get it fixed in ten minutes or less if he would have visited my site first. Unfortunately, for him it's over, but you can find a solution on the paid page below.
|
|
Leaking PVC Pipe Trick
 Unfortunately it doesn’t matter how good you use a cleaner and PVC cement, but from time to time those pipes are leaking. The other week my boss sent me to do just that: to fix a leak in the PVC exhaust pipe. Unfortunately it doesn’t matter how good you use a cleaner and PVC cement, but from time to time those pipes are leaking. The other week my boss sent me to do just that: to fix a leak in the PVC exhaust pipe.
When I arrived at the house I found a new guy for at least an hour hopelessly trying to fix the problem. He was applying layer after layer of the PVC cement on a leaking spot but it obviously didn’t work! When he saw me he said that he needs two couplings, two pieces of pipes and a new elbow to replace the leaking one. I said no, this is not how in our company we fix such minor problems . Nowadays it’s easier to fire your sorry, stupid ass than spend time and materials for nothing! So I’ve fixed that leak in less than 3 minutes!
The problem which was resolved above can occur in any house at any time. If you want to save money and time instead of calling for an HVAC tech or a plumber ($ 80.00 only for a knock at the door) you can fix it very easy by yourself. With the tools which you already have and materials that you can buy you can fix it for less than $10.
So, purchase a solution to the problem just for $1.00 – do it yourself and save!
|
|
How to Stop Cold Air from Fresh Air (Combustion Air) Vent in Furnace Room
For years, I've heard about these issues related to the combustion air intakes, but never faced it myself before. However, recently I install one in my house and now I joined a legion of people who are trying to resolve this inconvenience once and for all!
At first as many of you, I've searched the web and all the solutions that I found there were just laughable:
1. Drop the pipe down into an empty 5-gallon bucket.
It doesn't work. You can try it at home just as I did - the result is obvious!
2. Forming very large P-trap with the flexible duct, I am forcing the cold intake air to travel 3 feet uphill again before dropping down into an empty 5-gallon bucket.
I don't even want to give it a try, this idea even if it works is just plain stupid. Just think about it: who in his straight state of mind would buy a box of flex and make a goofy P-trap out of it and after this all done on top of it, again, drop it in a bucket?
3. Install a motorized damper designed by Hoyme.
Well, this is not a really bad idea, but it doesn't work. It doesn't work because you can hook up this damper to the furnace only, and as it said above: "You can install a heat sensor on the tank that will open the damper up".
Look, the average price for the damper is $225.95, plus shipping and handling. Plus installation, and plus a heat sensor with installation - just too expensive!
4. Relocate your fresh air intake combustion pot near the furnace.
Just read above it doesn't work.
5. Ditch the mid-efficiency furnace and go with a high-efficiency furnace.
This one is just plain stupid, I do not want to even discuss it here!
So, I've looked at all this solutions and come up with my own one. Bought materials, installed it and let it work for awhile. It is working.
Now it is time to share this simple and very inexpensive solution (I spent less than $10 on my 4" combustion air intake) with visitors of my site.
On the paid page, you will see pictures of tools and materials and three pictures of installation with step-by-step explanations.
The price for an instant access to the page is only $1.86.
Instant Access:
After you have purchased a paid page; PayPal is going to bring you back to my website. In order to see the paid page you have to click on the “Register” button, fill out the form, choose your own Username and Password and click on the “Register” button at the bottom of the form – congratulation, you are now on the page you have paid for!
Important: After you have purchased any Paid page or Download page and PayPal brought you back to my website, the first thing that you should do is to save that page to your Favorites. Then if something goes wrong you always can come back to re-register yourself on my website again.
|
|
I've found this post on one of the Forum websites:
Reducing Ambient/Crosstalk Noise in Room-to-Room Vents
Hello, first post on here, but pretty frequent reader.
Here is my current dilemma:
We have a forced air heating/cooling system in our house that has a central cold air return on the first floor. The bedrooms on the second floor do not have cold air returns; however, they have openings above each doorway for ventilation. The openings are framed out to about 2'x2' and are the depth of a standard 2x4, so about 3.5" deep. They have normal louvered return air grills on them.
As you can imagine, they do not do a lot for noise. Our daughter's bedroom is basically right at the top of the stairs, above our two story great room. We have actually resorted to not watching TV or anything after she goes to bed because the noise goes right through the vent into her room.
I am considering lining the opening with so insulation or something to help cut down any sharp angles, but is there anything I can put in there that will reduce the noise while still allowing for airflow?
I have searched and searched but everything I keep finding refers to noise in the actual ductwork, of which there isn't any...
Thanks guys!
It is very unfortunate that this guy couldn't find my website and asked this question directly, but if you have a similar problem I think that I found a solution! By the way, people are trying to help him out, but so far, their solutions won't work.
Therefore, here's what he should be doing:
He has to install two ceiling, or even better, two wall cold air return grills (transfer grills) and connect them through the attic by using a long piece of insulated flex.
If you like this idea and if you would like to give it a try, but do not know how to do it, you can purchase an Ductwork Installation in Attic ($2.00) page. On the page you can see how to install returns in the walls, or/and you can purchase a Chapter #56 of my Ductwork Installation Guide ($2.00) book in the case that you prefer returns in the ceiling or you can see it for free on this page.
|
|
How to Double Level of Relative Humidity in Your House
Low humidity level is most likely the cause of some pretty significant health issues. The optimal relative humidity level for human comfort and health is anywhere from 30% to 50%.
Here are some of the results of low humidity:....
|
|
|
A website "ductworkinstallation. com" focus on providing information and services related to the installation of ductwork systems , which are the tubes used to distribute heated or cooled air throughout a building as part of an HVAC system; essentially, it would be a platform for individuals or companies specializing in designing and installing ductwork for homes and commercial properties, offering details on the process, and potential contractors to contact for such services.
Key points about ductwork installation websites:
Services offered:
New ductwork installation, ductwork repair, duct cleaning, duct sealing, airflow balancing.
Target audience:
Homeowners looking to install a new HVAC system, individuals experiencing issues with their existing ductwork, commercial property owners needing ductwork for large buildings.
Information provided:
Explanations on different types of duct materials, design considerations for optimal airflow, potential benefits of proper ductwork installation.
|
|